04 December 2018

play with WLST

Deleting JMS messages using WLST

At time you will see that your environment ends up with n numbers of messages getting piled up, and it is not always a good option to remove the Filestore, instead another option is to purge/delete the messages from queues.

do the following to achieve this

# set WLS environment
$ ORACLE_HOME/wlserver/server/bin/./setWLSenv.sh

# launch WLST
$ ORACLE_HOME/oracle_common/common/bin/./wlst.sh

$ java weblogic.WLST
wls:/offline>connect('weblogic','weblogic1','t3://192.0.0.123:7001') wls:/domain/serverConfig>serverRuntime() wls:/domain/serverRuntime>cd('JMSRuntime') wls:/domain/serverRuntime/JMSRuntime>:ls() wls:/domain/serverRuntime/JMSRuntime>:cd('server.jms') wls:/domain/serverRuntime/JMSRuntime/server.jms> cd ('JMSServers') wls:/domain/serverRuntime/JMSRuntime/server.jms/JMSServers>cd (JMSServer-1')

**
wls:/WLST_domain/serverRuntime>cd('JMSRuntime/managed1_wls.jms/JMSServers/JMSServer-1/Destinations/SystemModule-0!com/fixstream/benifits/dr/out/dq')
wls:/WLST_domain/serverRuntime/JMSRuntime/managed1_wls.jms/JMSServers/JMSServer-0/Destinations/SystemModule-0!Queue-0> ls()
wls:/WLST_domain/serverRuntime/JMSRuntime/managed1_wls.jms/JMSServers/JMSServer4/Destinations/SystemModule-0!Queue-0> cmo.deleteMessages('')
**

do the necessary changes and that's it.

App Un-deployment using WLST


# set WLS environment
$ ORACLE_HOME/wlserver/server/bin/./setWLSenv.sh

# launch WLST
$ ORACLE_HOME/oracle_common/common/bin/./wlst.sh

$ java weblogic.WLST
wls:/offline>connect('weblogic','weblogic1','t3://192.0.0.123:7001') wls:/domain/serverConfig>listApplications() wls:/domain/serverConfig>edit() wls:/domain/serverConfig/startEdit() wls:/domain/serverConfig/stopApplication('myapp') wls:/domain/serverConfig/undeploy('myapp') wls:/domain/serverConfig/save()
wls:/domain/serverConfig/activate()
wls:/domain/serverConfig/exit()

# use below command to Deploy application
deploy('myapp','/app/deliv/myapp.war',targets='managed1_mydom01')


--

13 February 2018

SAF agent in Weblogic

Store and Forward mechanism of JMS between weblogic domains only
Key components include SAF agent with JMS-Module with resources:
  • SAF Error Handling
  • SAF Remote Context (when setting this resource we don't need to give remote domain credentials if we have already established trust between the two)
  • SAF Imported Destinations
In case of any issue, troubleshooting will include:
trust issue between domains: "serverIdentity failed Validation. Downgrading to Anonymous"
Firewalls: make sure necessary ports are open to communicate, checking by telnet
Patch Level: SAF will not support sending messages to the downgraded level of WLS
JMS resources not targeted properly

Debug Logs for SAF


 Sending side
 DebugSAFSendingAgent
 DebugJMSSAF
 DebugSAFMessagePath
 DebugSAFManager
 Receiving side
 DebugJMSSAF
 DebugSAFReceivingAgent
 DebugSAFVerbose
 if no receiving SAF then:
 DebugJMSBackEnd
 DebugJMSFrontEnd
 DebugJMSMessagePath


"change log severity to debug on both sides & disable all existing debugs"

SAF or Bridge
Advantages over Bridge
– SAF is faster and more scalable b/w WLS-WLS connectivity.
– clusterable.
– Bridges still supported and useful for non-WLS connectivity or pre-WLS10.0 destinations.
Disadvantage (When not to use the SAF service)
– SAF can’t be used with other products like Jboss, Glassfish, IBM MQ server, etc., for sending the messages.
– Forwarding messages to prior releases of WebLogic Server. (no backward compatibility)
– When using temporary destinations with the JMSReplyTo field to return a response to a request.

Thus I do not encourage using SAF over Bridges, rather I discourage using SAF over Bridge due to its buggy behaviour and its restricted behaviour since you cannot integrate it with other messaging technologies but bridges will allow you to do so.

For more reasons to avoid SAF agent within FMW please look onto Oracle Blog

--
Punit

14 December 2017

Study JMS Bridge with its quick setup in webLogic domain

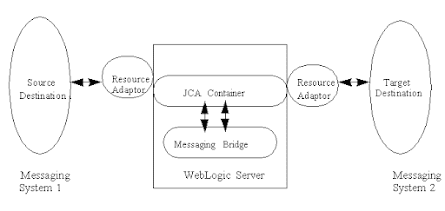
It is a forwarding mechanism between any two messaging products. ie between two JMS's of WebLogic
or between Weblogic JMS and other messaging product.
Basically, this messaging bridge consists of two destinations ( Source & target) that are being bridged.

Here we use “jms-notran-adp” which is the default adapter created for JMS Messaging Bridge with default QOS selected as “Exactly-Once”.

Configure WebLogic domain with the following configuration:
  • One Admin Server
  • One Managed server
  • One JMS server targeted to Admin
  • another targeted to Managed server
Create a JMS Module targeted to the Admin Server.
              Inside this JMS module create the below resources.
  • JMS Connection Factory (default targeting)
  • JMS Sub Deployment targeted to JMS server which is targeted to Admin Server
  • JMS Queue targeted to Sub Deployment created in the above step.
Create a JMS Module targeted to the Managed Server.
              Inside this JMS module create the following resources:
  • JMS Connection Factory (default targeting)
  • JMS Sub Deployment targeted to JMS Server which is targeted to Managed Server
  • JMS Queue targeted to JMS Sub Deployment created in the above step
Create a JMS Bridge Destination for the Admin Server Queue with the following details.

              For creating a JMS Bridge Destination, 
              click on the left panel in the console and go to:

                                 Services -> Messaging -> Bridges.
  1. Leave Adapter JNDI default name as is to “eis.jms.WLSConnectionFactoryJNDINoTX”
  2. Initial Context Factory as default to “weblogic.jndi.WLInitialContextFactory”
  3. For connection URL specify the t3 listen address of the Admin server, e.g., t3://localhost:7001.
  4. For Connection Factory JNDI Name specify the Connection Factory JNDI Name which is part of the JMS Module targeted to Admin Server.
  5. For Destination, JNDI Name selects JMS Queue JNDI name which is part of JMS Module targeted to Admin Server.
  6. Select Destination Type as “Queue”.
Create the JMS Bridge Destination for the Managed Server Queue same as the above steps.

                 Below are the details.
  1. Leave Adapter JNDI name as is as default to “eis.jms.WLSConnectionFactoryJNDINoTX” 
  2. Initial Context Factory as default to “weblogic.jndi.WLInitialContextFactory”
  3. For connection URL specify the t3 listen address of the Managed server, e.g. t3://localhost:7002
  4. For connection Factory JNDI Name specify the Connection Factory JNDI Name which is part of JMS Module targeted to Managed Server
  5. For destination JNDI Name select JMS Queue JNDI name which is part of JMS Module targeted to Managed Server
  6. Select Destination Type as “Queue”
Now we will configure JMS Messaging Bridge which will pick up the messages from JMS Queue on Managed Server and will forward them to JMS Queue on Admin Server.

 For this we have to select: 
  •  source destination of JMS Bridge as Managed server Queue
  •  & target destination as Admin Server queue.
Now create JMS Messaging Bridge with below details:

            Select the “Started” checkbox when creating JMS Bridge

                      For “Existing Source Destination”
  • select the JMS Bridge Destination created for Managed server in the above step
  • Leave Messaging Provider as is to default as “WebLogic Server 7.0 or higher”
                      For “Existing Target Destination”
  • select the JMS Bridge Destination created for the Admin server in the above step
  • Target the Messaging Bridge to Managed server.
  • Once Messaging Bridge is created click on it and a select checkbox for “QOS Degradation Allowed” 
  • and save the changes.
After the above configuration, you will see a “jms-notran-adp” resource adapter deployed on the Managed Server which is used by JMS Messaging Bridge. Restart your Domain Admin and Managed Server after the above configuration.

Validating JMS Bridge Configuration:

Once the JMS Bridge Configuration is complete using the above steps and the servers are restarted, login to console to check the JMS Messaging Bridge Status.

From the Administration console, click on JMS Messaging Bridge and go to the Monitoring tab.
The state of Bridge should be reported as “Active” and Description as “Forwarding messages.”
This means that the JMS Bridge configuration is successful, up and active in forwarding messages.

In this sample use case, JMS Bridge targeted to Managed server is picking messages from Managed Server JMS Queue and forwarding them to Admin Server JMS Queue.

Br,
Punit

30 August 2016

Study on JMS Bridge

The WebLogic JMS adapter is being used for JMS bridge configuration. When the JMS
source/destination is restarted, the adapter is not able to reconnect to the restarted instance.
Only a redeployment of the JMS resource adapter resolves the problem.
We suspect that the connections in the resource adapter connection pool are never being refreshed since WebLogic is not able to detect the invalid connections.
In order to make the resource adapter detect invalid connections, we need to make the resource adapter connections testable.
For this to happen, the JMS adapter's ManagedConnectionFactory should implement the javax.resource.spi.ValidatingManagedConnectionFactory.

The JMS bridge is failing to refresh the consumer connections after a DB failover.
The JMS adapter is not responsible for the failover activities. It is the JMS bridge which is responsible for refreshing the connections.

The problem can be resolved by changing the JMS Connection Factory configuration. Change the client reconnect policy to be "all" (the default is producer). See the following XML example:

|reconnect-policy|all|/reconnect-policy|


When the destination domain is restarted, the source bridge was failing to connect with the following exception:
 
com.mslv.oms.automation.AutomationException: com.mslv.oms.automation.AutomationException: Destination not found

The Messaging Bridge stops processing messaging and a server thread dump reveals the bridge is stuck waiting on ConnectionWrapper.invoke(). This issue is addressed by BUG 8066979

On the destination domain, disable Server Affinity on the Target Connection Factory to allow proper load balancing on both Distributed Queue members. To do this, go to JMS Modules -> ConnectionFactory ->Configuration ->Load Balance.
On the Source domain, apply the patch for BUG 8066979 as specified below to the Bridge host domain and retest.

Br

08 December 2014

What is Persistence Store

Each server instance, including the administration server, has a default persistent store that requires no
configuration. The default store is a file-based store that maintains its data in a group of files in a server instance's 
data\store\default directory. A directory for the default store is automatically created if one does not already exist.

In addition to using the default file store, you can also configure a custom file store or JDBC store to suit your specific needs.

You can, however, specify another location for the default store by directly manipulating the DefaultFileStoreMBean parameters or by using the Administration Console.

When to Use a Custom Persistent Store

WebLogic Server provides configuration options for creating a custom file store or JDBC store. For example, you may want to:
  • Place a file store's files on a particular device.
  • Use a JDBC store rather than a file store for a particular server instance.
  • Allow all physical stores in a cluster to share the same logical name.
  • Logically separate different services to use different files or tables.

Methods of Creating a Persistent Store

A customized persistent store can be configured in the following ways:
  • Use the Administration Console to configure a custom file store or JDBC store.
  • Directly edit the configuration file (config.xml) of the server instance that is hosting the default persistent store.

Main Steps for Configuring a Custom File Store

The main steps for creating a custom file store are as follows:

  1. Create a directory where the file store's data will be persisted.
  2. Create a custom file store and specify the directory location that you created.
  3. Associate the custom file store with the subsystem(s) that will be using it, such as:
    • For JMS servers, select the custom file store on the General Configuration page.

How to read JMS file store .DAT file


The JMS file store created will be with .DAT extension and is not in human readable format.
You will have to use the weblogic.store.Admin utility to extract the content of file store into an XML file to read it.
Follow below steps to read the DAT file:
Run the ./setDomainEnv.sh script:
Go to the directory of the JMS File Store location and type this command to display the store admin prompt.

java weblogic.store.Admin

Once logged into the WebLogic store admin prompt, use this command to open the JMS File store.

openfile -store <JMSFileStoreName>

Once file store is open use the next command to dump the content of the file store. This command will dump the output of file store into specified <filename>.xml file in location from where you launched store admin utility.

dump -store <JMSFileStoreName> -out <filename> -conn -deep

Close the file store.

close -store <JMSFileStoreName>

Run the quit command to exit from store admin utility.

quit

--