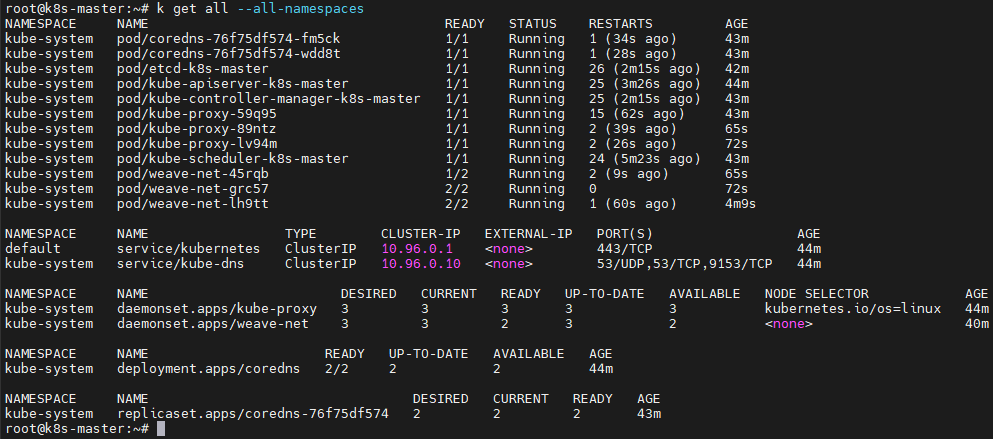
 |
| play with Kubernetes |
- Launching kubernetes cluster locally ( 1Master and 2 worker nodes) BAREMETAL K8s
- Launching Kubernetes cluster locally as a single node cluster MINIKUBE
- Launching Kubernetes cluster in a cloud provider GKE on GCP
- Launching Kubernetes cluster as a managed service EKS on AWS
- Launching Kubernetes cluster as a compute fargate profile EKS on FARGATE
Launching K8S-cluster locally (1-Master 2 worker nodes)
Note: not all versions of docker supports kubernetes you need to install compatible version when needed
Pre-requesitesdocker - runtime container
kubelet - k8s node agent that runs on all nodes in your cluster and starts pods and containers
kubeadm - admin tool that bootstrap the cluster
kubectl - command line util to talk to you cluster
CNI - install support for Container networking/ContainerN/wInterface
to begin with the configuration
# check if your Linux is in permissive mode$ getenforce // should return Permissive # Command to setup UBUNTU sudo mkdir -p /etc/apt/keyrings curl -fsSL https://pkgs.k8s.io/core:/stable:/v1.29/deb/Release.key | sudo gpg --dearmor -o /etc/apt/keyrings/kubernetes-apt-keyring.gpg echo "deb [signed-by=/etc/apt/keyrings/kubernetes-apt-keyring.gpg] https://pkgs.k8s.io/core:/stable:/v1.29/deb/ /" | sudo tee /etc/apt/sources.list.d/kubernetes.list
$ sudo apt update $ sudo apt install -y kubelet kubeadm kubectl $ sudo apt-mark hold kubelet kubeadm kubectl // to hold the version on installed packages---LINUX
$ vi /etc/yum.repos.d/kubernetes.list add--> deb http://apt.kubernetes.io/ kubernetes-xenial main or use REPO: kubernetes.repo
$ yum update $ yum install docker.io kubeadm kubectl \ kubelet kubernetes-cni --disableexcludes=kubernetes $ systemctl start docker kubelet && \ systemctl enable docker kubelet
# installing kubectl client $ curl -LO https://storage.googleapis.com/kubernetes-release/release/v1.23.6/bin/linux/amd64/kubectl
$ chmod +x kubectl && mv kubectl /usr/bin/---
## Install container Runtime

 $ sudo apt install -y containerd
 $ sudo systemctl enable containerd --now
===
Load the required Modules -
# Load kernel modules
cat <<EOF | sudo tee /etc/modules-load.d/k8s.conf
overlay
br_netfilter
EOF

sudo modprobe overlay
sudo modprobe br_netfilter

# Set sysctl params
cat <<EOF | sudo tee /etc/sysctl.d/k8s.conf
net.bridge.bridge-nf-call-iptables  = 1
net.bridge.bridge-nf-call-ip6tables = 1
net.ipv4.ip_forward                 = 1
EOF

# Apply settings
sudo sysctl --system
===Additionally, you can use the following kubectl commands for k8s-cluster management
 # Cluster maintainance
 $ kubectl drain NodeName // this will moves your node to SchedullingDisabled state
 $ kubectl drain --delete-local-data --ignore-daemonsets --force NodeName
$ kubectl uncordon NodeName // which Make the node schedulable again
# Uninstall k8s-cluster
$ kubeadm reset
$ sudo yum remove kubeadm kubectl kubelet kubernetes-cni kube*
# Deploy k8s cluster specifying pod network via kubeadm
$ kubeadm init --apiserver-advertise-address=MasterIP --pod-network-cidr=192.168.0.0/16
Follow the article here in case if you face different issues while setting up your cluster
and the result will be like
your Kubernetes master has initialized successfully
 mkdir -p $HOME/.kube
 sudo cp -i /etc/kubernetes/admin.conf $HOME/.kube/config
 sudo chown $(id -u):$(id -g) $HOME/.kube/config

 You should now deploy a pod network to the cluster.
 Run "kubectl apply -f [podnetwork].yaml" with one of the options listed at:
  https://kubernetes.io/docs/concepts/cluster-administration/addons/

 Then you can join any number of worker nodes by running the following on each as root:
kubeadm join 192.168.0.104:6443 --token oknus0.i1cuq7i6vw51i --discovery-token-ca-cert-hash sha256:752f..
configure an account on the master
# now grab the three commands from output as shown in above image run them with a regular user to configure your account on master, + to have admin access to API server from a non-privileged account
$ mkdir -p $HOME/.kube
$ sudo cp -i /etc/kubernetes/admin.conf $HOME/.kube/config
$ sudo chown $(id -u):$(id -g) $HOME/.kube/config
$ kubectl get nodes
$ kubectl get pods --all-namespaces
# if your normal user is not a sudoer then do this
$ vi /etc/sudoers
add following entry next to root user as shown below
root ALL=(ALL) ALL
red ALL=(ALL) NOPASSWD:ALL
# if still fails to run kubectl command and fails with below error
The connection to the server x.x.x.x:6443 was refused - did you specify the right host or port?
consider checking kubelet status by running below command it should be active and running
$ sudo systemctl kubelet status
if it is inactive
# check swap status, if it is enabled, disable it & restart kubelet $ sudo swapoff -a $ sudo systemctl restart kubelet
# to add pod-network you can install only one pod-network/cluster, either use calico, weave, flannel or any CIN provider
$ kubectl apply --filename https://github.com/weaveworks/weave/releases/download/v2.8.1/weave-daemonset-k8s.yaml
$ kubectl apply -f https://docs.projectcalico.org/v3.11/manifests/calico.yaml
# if you fail to deploy pod network, you might need to do the following:
$ sudo swapoff -av
$ sudo systemctl restart kubelet
$ sudo reboot now
for more refer: CALICO NETWORKING
check nodes status again, you will see them Ready & Running
time to run minions (adding your worker nodes)
 # go to Node2 & Node3 and run the command given by K8S-cluster when initialized

   Ensure you have fulfilled the pre-reqs (docker/kubectl/kubeadm/kubelet/kubernetes-cni)

 $ kubeadm join 192.168.0.104:6443 --token zo6fd9.j26yrdb9qlu1190n \
--discovery-token-ca-cert-hash sha256:c165160bd18b89ab7219ec5bd5a60cfca24887ee816c257b84451c9feaf0e05a
# if fails while joining cluster with [ERROR FileContent--proc-sys-net-bridge-bridge-nf-call-iptables]: /proc/sys/net/bridge/bridge-nf-call-iptables contents are not set to 1
provision your nodes with the following command
$ echo '1' > /proc/sys/net/bridge/bridge-nf-call-iptables
# at times kubectl commands fails to give o/p while running any command and results with error:
Unable to connect to the server: net/http: request canceled while waiting for connection (Client.Timeout exceeded while awaiting headers)
you may have some proxy problems, try running following command:
$ unset http_proxy
$ unset https_proxy
and repeat your kubectl call
check the status from any node you will see a master & 2 workers in a ready state
$ kubectl get nodes NAME STATUS ROLES AGE VERSION
k-master Ready master 196d v1.12.10+1.0.15.el7
k-worker1 Ready <none> 196d v1.12.10+1.0.14.el7
k-worker2 Ready <none> 196d v1.12.10+1.0.14.el7
finally, your cluster is ready to host deployment, now once you do deployment pods will be spread across workers
$ kubectl get pods -o wide NAME READY STATUS RESTARTS AGE IP NODE NOMINATED NODE
myapp-deployment-844fd-f27nv 1/1 Running 0 14s 192.168.110.183 k-master1 <none>
myapp-deployment-844fd-kvwzk 1/1 Running 0 14s 192.168.110.183 k-master1 <none>
myapp-deployment-844fd-v8xsv 1/1 Running 0 15s 192.168.110.181 k-master2 <none> Launching Kubernetes-Cluster on the Google Cloud Platform
Go to Navigation menu--> Kubernetes engine --> clusters
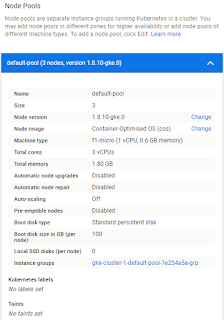
provide all the details as per requirement like Zone, number of CPU's, OS, size of cluster(number of nodes/minions not include master- as that's taken care by platform behind the scene) and click create
same time GCP gives you a command-line option to create the cluster as:
same time GCP gives you a command-line option to create the cluster as:
$ gcloud container --project "gcp-gke-lab-7778" \clusters create "cluster-1" \ --zone "asia-south1-a" --username "admin" \--cluster-version "1.8.10-gke.0" \ --machine-type "f1-micro" --image-type "COS" \--disk-type "pd-standard" --disk-size "100" \ --scopes "https://www.googleapis.com/auth/compute",\"https://www.googleapis.com/auth/devstorage.read_only",\"https://www.googleapis.com/auth/logging.write",\"https://www.googleapis.com/auth/monitoring",\"https://www.googleapis.com/auth/servicecontrol",\"https://www.googleapis.com/auth/service.management.readonly",\"https://www.googleapis.com/auth/trace.append" \ --num-nodes "3" --network "default" --subnetwork "default" \--addons HorizontalPodAutoscaling,HttpLoadBalancing,KubernetesDashboard \ --no-enable-autoupgrade --no-enable-autorepair
# to configure kubectl command-line access$ gcloud container clusters list$ gcloud container clusters get-credentials cluster-1 \
--zone asia-south1-a --project psyched-metrics-208409


No comments:
Post a Comment