What is SiteMinder ?

SiteMinder provides policy-based authentication, authorization as well as single sign-on for all Web-based applications. It is owned by CA technologies.
How SiteMinder Works ?
SiteMinder can be deployed in both proxy server and agent configurations. The agent configuration installs a software agent on the web server.
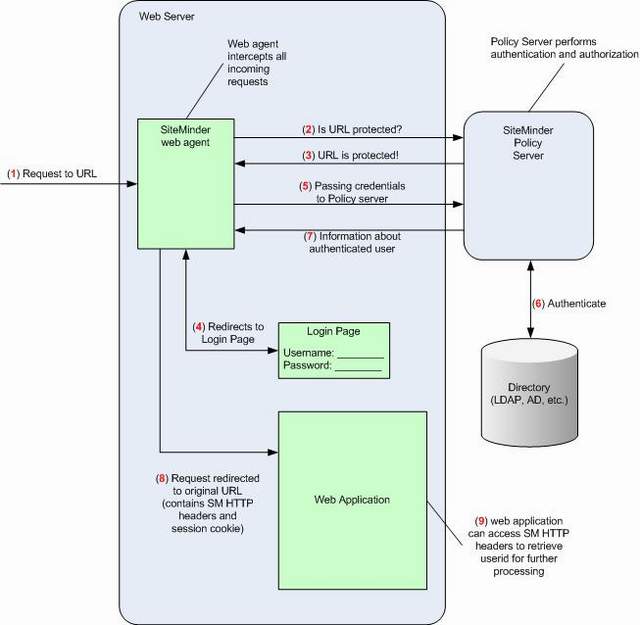
The following steps occur when a user tries to access a protected resource on a web server configured to use SiteMinder authentication:
1. The user requests a resource on the server, either through a web browser or in a program using an HTTP request.
2. The request is received by the web server and is intercepted by the SiteMinder web agent.
3. The web agent determines whether or not the resource is protected, and if so, gathers the user’s credentials and passes them to the Policy server.
4. The Policy server authenticates the user and verifies whether or not the authenticated user is authorized for the requested resource, based on rules and policies contained in the Policy store.
5. After the user is authenticated and authorized, the Policy server grants access to the protected resources.
In step 3 above, if no SiteMinder session exists, users are redirected to a login page where they are prompted to enter their credentials. Once the user is authenticated, a cookie is added to the response headers, creating a SiteMinder session. When this cookie is included on subsequent requests, the user is directed to the original URL without further prompting. More detail is presented in Figure 1 below.
How to Install Siteminder Webagent
This article covers webagent configuration of already host registered webagent on any webserver. The following steps are for apache webserver. Before you proceed with below mentioned steps please stop apache webserver instance.
1. cd /opt/netegrity/intranet/siteminderR12R12/webagent & run the below command to configure the webagent for any webserver instance. Follow the below options as mentioned.
red@smhost /opt/netegrity/intranet/siteminderR12R12/webagent $ ./ca-wa-config.sh
Preparing to install...
Extracting the JRE from the installer archive...
Unpacking the JRE...
Extracting the installation resources from the installer archive...
Configuring the installer for this system's environment...
Launching installer...
Graphical installers are not supported by the VM. The console mode will be used instead...
Preparing CONSOLE Mode Installation...
SiteMinder provides policy-based authentication, authorization as well as single sign-on for all Web-based applications. It is owned by CA technologies.
How SiteMinder Works ?
SiteMinder can be deployed in both proxy server and agent configurations. The agent configuration installs a software agent on the web server.
The following steps occur when a user tries to access a protected resource on a web server configured to use SiteMinder authentication:
2. The request is received by the web server and is intercepted by the SiteMinder web agent.
3. The web agent determines whether or not the resource is protected, and if so, gathers the user’s credentials and passes them to the Policy server.
4. The Policy server authenticates the user and verifies whether or not the authenticated user is authorized for the requested resource, based on rules and policies contained in the Policy store.
5. After the user is authenticated and authorized, the Policy server grants access to the protected resources.
In step 3 above, if no SiteMinder session exists, users are redirected to a login page where they are prompted to enter their credentials. Once the user is authenticated, a cookie is added to the response headers, creating a SiteMinder session. When this cookie is included on subsequent requests, the user is directed to the original URL without further prompting. More detail is presented in Figure 1 below.

How to Install Siteminder Webagent
This article covers webagent configuration of already host registered webagent on any webserver. The following steps are for apache webserver. Before you proceed with below mentioned steps please stop apache webserver instance.
1. cd /opt/netegrity/intranet/siteminderR12R12/webagent & run the below command to configure the webagent for any webserver instance. Follow the below options as mentioned.
red@smhost /opt/netegrity/intranet/siteminderR12R12/webagent $ ./ca-wa-config.sh
Preparing to install...
Extracting the JRE from the installer archive...
Unpacking the JRE...
Extracting the installation resources from the installer archive...
Configuring the installer for this system's environment...
Launching installer...
Graphical installers are not supported by the VM. The console mode will be used instead...
Preparing CONSOLE Mode Installation...
=======
CA SiteMinder Web Agent (created with InstallAnywhere)
=======
Host Registration
Select '1' to register this Agent with the Policy Server.
Select '2' to register later.
Note: You cannot select choice 1 and 2 at the same time.
Warning: You have already registered this Agent with a Policy Server.
->1- Yes, I would like to do Host Registration now.
2- No, I would like to do Host Registration later.
ENTER A COMMA-SEPARATED LIST OF NUMBERS REPRESENTING THE DESIRED CHOICES, OR
PRESS TO ACCEPT THE DEFAULT: 2
=============================
Select Web Server(s)
-------------------
Select which Web Server(s) you want to configure as a Web Agent.
You will have to enter a path for each selected web server.
Note: If you have an Apache-based Web server, please select the Apache Web Server option.
1- Apache Web Server
2- Domino Web Server
->3- iPlanet or Sun ONE Web Server
ENTER A COMMA-SEPARATED LIST OF NUMBERS REPRESENTING THE DESIRED CHOICES, OR
PRESS TO ACCEPT THE DEFAULT: 1
=============================
Apache Web Server path
---------------------
Enter the root path of where Apache Web server installed.
Please enter path (DEFAULT: ): abacdef (Give any null value as we will be providing the webserver conf path in the next step)
=============================
Apache Web Server Failure
-------------------------
Apache webserver path is not a directory: abacdef.
Note: If you have any other Apache Web servers that may not be detected by the
Wizard, please select choice "2".
->1- I would like to re-enter the Apache Server Root.
2- I would like to enter a specific configuration path.
3- I don't have an Apache Web server.
ENTER THE NUMBER OF THE DESIRED CHOICE, OR PRESS TO ACCEPT THE
DEFAULT: 2
=============================
Apache Web Server path
----------------------
Please enter the configuration path for Apache Web server.
Please enter path (DEFAULT: ): /apps/GTS/https-sm/conf
=============================
Apache Version
--------------
Please select a choice for the Apache version.
1- Apache version 1.x
2- Apache version 2.0.x
3- Apache version 2.2.x
ENTER THE NUMBER OF THE DESIRED CHOICE: 3
==============================
Apache Server Type
------------------
Please select one of the following appropriately match your previous selection
1- Strong Hold
2- Oracle
3- IBM HTTP Server
->4- Covalent Enterprise-Ready Apache or FastStart Server
5- HP Apache
6- HTTP Apache
ENTER THE NUMBER FOR YOUR CHOICE, OR PRESS TO ACCEPT THE DEFAULT:: 6
==============================
Select Web Server(s)
--------------------
1- [] Apache 2.2
Select which web server(s) you wish to configure/reconfigure as Web
Agent(s).Enter a comma-separated list of numbers representing the desired
choices.: 1
==============================
Agent Configuration Object
--------------------------
Enter the name of an Agent Configuration Object that defines the configuration parameters which the Web Agent will use for Apache 2.2.
Agent Configuration Object (DEFAULT: AgentObj): aco-gpos-wdvrw99a0038 (will be provided the requestor)=======================
SSL Authentication
------------------
The following SSL configurations are available for this web server. If the Web Agent will be providing advanced authentication, select which configuration it will use to configure Apache 2.2.
->1- HTTP Basic over SSL
2- X509 Client Certificate
3- X509 Client Certificate and HTTP Basic
4- X509 Client Certificate or HTTP Basic
5- X509 Client Certificate or Form
6- X509 Client Certificate and Form
7- No advanced authentication
ENTER THE NUMBER FOR YOUR CHOICE, OR PRESS TO ACCEPT THE DEFAULT:: 7
===============================
Self Registration
----------------
If this Web Agent is providing Self Registration for DMS2, select 'Yes'. Otherwise, select 'No'.
->1- Yes, I would like to configure Self Registration
2- No, I don't want to configure Self Registration
ENTER THE NUMBER FOR YOUR CHOICE, OR PRESS TO ACCEPT THE DEFAULT:: 2
===============================
Web Server Configuration Summary
--------------------------------
Please confirm the configuration selection. Accept the configuration and press
'Enter' to continue. To change one or more settings, select 'Previous'.
Select 'Cancel' will exit the configuration.
Configure the following webserver(s):
Apache Server:
Apache 2.2
Agent Configuration Object: aco-gpos-wdvrw99a0038
SSL Authentication type: No advanced authentication
Please enter a choice.
->1- Continue
2- Previous
3- Cancel
ENTER THE NUMBER OF THE DESIRED CHOICE, OR PRESS TO ACCEPT THE
DEFAULT: 1
===============================
Installing...
-------------
[==================|==================|==================|==================]
[------------------|------------------|------------------|------------------]
===============================================================================
Configuration Complete
----------------------
Congratulations! CA SiteMinder Web Agent has been successfully configured.
PRESS TO EXIT THE INSTALLER:
2. After you exit from the installer successfully; you can see new files LocalConfig.conf, WebAgent.conf, & updated httpd.conf with site minder details & httpd.conf.2015-10-20-13-59-17.bak
3. Edit the EnableWebAgent="NO" to EnableWebAgent="YES" in WebAgent.conf
4. cp httpd.conf httpd.conf_WITH_SM
5. cp httpd.conf.2015-10-20-13-59-17.bak httpd.conf
6. Edit httpd.conf & add the below mentioned lines at the end of the file:
# SM Configuration
Include /apps/GTS/https-sm/conf/extra/sm.conf
The above steps mean as we keep siteminder configuration in a separate sm.conf; we don’t want the siteminder details to be included in httpd.conf; therefore we replace it with the backed up file after webagent configuration command exits.
7. Now go to /apps/GTS/https-sm/conf/extra & create sm.conf;
LoadModule sm_module "/opt/netegrity/intranet/siteminderR12R12/webagent/bin/libmod_sm22.so"
SmInitFile "/apps/GTS/https-sm/conf/WebAgent.conf"
PassEnv LD_LIBRARY_PATH
Alias /siteminderagent/pwcgi/ "/opt/netegrity/intranet/siteminderR12R12/webagent/pw/"
Options Indexes MultiViews ExecCGI
AllowOverride None
Order allow,deny
Allow from all
Alias /siteminderagent/pw/ "/opt/netegrity/intranet/siteminderR12R12/webagent/pw/"
Options Indexes MultiViews ExecCGI
AllowOverride None
Order allow,deny
Allow from all
Alias /siteminderagent/ "/opt/netegrity/intranet/siteminderR12R12/webagent/samples/"
Options Indexes MultiViews
AllowOverride None
Order allow,deny
Allow from all
# Siteminder LOGIN
Alias /login/ "/apps/GTS/docs/https-sm/login/"
AllowOverride None
Order allow,deny
Allow from all
8. Then go to /apps/GTS/https-sm & edit apache.ini to add the below mentioned line:
. /opt/netegrity/intranet/siteminderR12R12/webagent/ca_wa_env.sh
9. Copy the login.zip file /apps/GTS/docs/https-sm/ & unzip it there; change the permissions to 750.
10. After all the above the steps are completed you can start the apache webserver instance.
Configuration of Webagent.conf and SmHost.conf
Webagent.conf
# WebAgent.conf - configuration file for SiteMinder Web Agent
# Web Agent Version = 12QMR3, Build = 824, Update = 11
#agentname=", "
HostConfigFile="/apps/CA/intranet/webagent/config/SmHost.conf"
AgentConfigObject="aco-sdd-wdvrw03a1001"
EnableWebAgent="YES"
ServerPath="/apps/GTS/https-sm/conf"
#localconfigfile="/apps/GTS/https-sm/conf/LocalConfig.conf"
LoadPlugin="/apps/CA/intranet/webagent/bin/libHttpPlugin.so"
#LoadPlugin="/apps/CA/intranet/webagent/bin/libAffiliate10Plugin.so"
#LoadPlugin="/apps/CA/intranet/webagent/bin/libSAMLAffiliatePlugin.so"
#LoadPlugin="/apps/CA/intranet/webagent/bin/libeTSSOPlugin.so"
#LoadPlugin="/apps/CA/intranet/webagent/bin/libIntroscopePlugin.so"
SmHost.conf
hostname="wdvrw03a1001"
sharedsecret="{AES}7PUfwa4aoKn4Awgx1wepAfc0e7w3z7zDNPlvHpC8I7omre9Q7kbE4ibIJV5pxWOi2aZufCs9Oy/QaOJQl21gDSQVFUMiQd5l5N/2ysvVdxVgmjTJfYZPAxFioourFJNoMT7SlE8I5FJpTcFFkb/3SWvqe3Vq99NXvqYm4Dy6grh7qK+oSZFMzcd8mVjuWYdM"
sharedsecrettime="0"
enabledynamichco="NO"
hostconfigobject="hco-wdvrw03a1001-shared"
# Add additional bootstrap policy servers here for fault tolerance.
#policyserver="10.91.23.141,44441,44442,44443"
#policyserver="10.91.23.141,0,44442,44443"
requesttimeout="60"
cryptoprovider="ETPKI"
fipsmode="ONLY"
Parameters used in webagent.conf
EnableWebAgent
Activates a Web Agent and allows it to communicate with the Policy server. Set this parameter to yes only after you have finished changing all of the configuration parameters.
Default: No
HostConfigFile
Specifies the path to the SMHost.conf file that is created after a trusted host computer has been successfully registered with a Policy server. All Web Agents on a computer share the SMHost.conf file.
LoadPlugin
Specifies which plug-ins are loaded for Web Agents. The plug-ins support different types of Agent functions. The following plug-ins are available
LocalConfigFile
Specifies the location of the LocalConfig.conf file, where most of Agent configuration settings reside
WebAgent.conf
Contains the core settings that the Web Agent uses to start and connect to a Policy Server.
LocalConfig.conf
Contains the configuration settings for the Web Agents.
ServerPath
It provides the path of conf file of apache instance
Agent Config Object(ACO)
An Agent Configuration Object holds the parameters that define the Web Agent configuration. The configuration object is the Policy Server counterpart to Web Agent configuration file, it is associated with the Web Agent being configured
Parameters used in SmHost.conf
Host Configuration Object (HCO)
Host Configuration Objects hold configuration settings for trusted hosts. After a trusted host connects to a Policy Server, it uses the setting in the HCO. An HCO is needed before a trusted host object can be created.
Policy Server
The purpose of the Policy server is to evaluate and enforce access control policy, which it communicates to an Agent. The Policy Server typically runs on a separate Windows or Solaris system to perform SiteMinder’s primary security operations. The Web Agent and Policy Server work together to authenticate and authorize users. The Policy Server grants access to protected resources and delivers privilege and entitlement information.
A Policy Server provides the following:
Policy-based user management.
Authentication services.
Password services.
Session management.
Auditing services.
Hostname:
A unique name that represents host to policy server
Requesttimeout
It specifies an interval of seconds during which the Agent that is acting as a trusted host waits before deciding that a Policy Server is unavailable. You can increase the time-out value if the Policy Server is busy due to heavy traffic or a slow network connection.
Default: 60
Example: requesttimeout="60
SharedSecret
An automatically generated encryption key used for encrypting traffic between the trusted host and the Policy Server. It is generated while registering the trusted host to policy server
Sharedsecrettime
The sharedsecrettime in the SmHost.conf specifies when the shared secret key is rolled over(changed periodically or manually based on configuration while registering host to policy server).
This setting is only valid if you enabled shared secret rollover during host registration, and then, it will show the last time the shared secret changed. If the value is 0, it means that shared secret rollover was not enabled.
Enabledynamichco
- You can connect a CA SiteMinder Agent to one or more dynamic Policy Server clusters by modifying the SmHost.conf file on your web server.
- If enabledynamichco=”YES” then it will connect to one or more dynamic added Policy Server if “NO” then it won’t connect to dynamic Policy Server clusters.
Fipsmode
- The Policy Server uses certified Federal Information Processing Standard (FIPS) 140–2 compliant cryptographic libraries. FIPS is a US government computer security standard that is used to accredit cryptographic modules that meet the Advanced Encryption Standard (AES). These libraries provide a FIPS mode of operation when a CA Single Sign-On environment only uses FIPS–compliant algorithms to encrypt sensitive data. A CA Single Sign-On environment can operate in one of the following FIPS modes of operation:
· FIPS–compatibility
· FIPS–migration
· FIPS–only
· COMPAT -- Specifies that the installation is not FIPS-compliant. Select this mode when interacting with clients running earlier versions of the CA SiteMinder Agent.
· MIGRATE -- Specifies that the CA SiteMinder Agent operates both with FIPS-compliant algorithms and algorithms that are used in earlier version of the agent simultaneously while the data is migrated. When the Policy Server is in Migrate mode, it can operate with the CA SiteMinder Agent in any mode.
· ONLY -- Specifies that the CA SiteMinder Agent only uses or accepts FIPS-compliant algorithms. When you install in this mode, extra configuration is required.
Cryptoprovider
Specifies the encryption method used for hardware encryption. Default value is BSAFE
How to register trusted host to Policy server
$ ./smreghost -i A -u THAdmin -p 4bubba -hc B -hn C -cf ONLY -o -f "Path of SMHost.conf"
Where:
A is the current primary policy server listed in SmHost.conf
B is the hostconfigobject listed in SmHost.conf
C is the server name
Example :
$ cd /opt/netegrity/intranet/siteminderR12/webagent/
$. ./ca_wa_env.sh
cd bin
./smreghost -i csibootstrapprd1 -u THAdmin -p 4bubba -hn wpvrw03a1001 -hc hco-wpvrw03a1001-shared -cf ONLY -o -f "/opt/netegrity/intranet/siteminderR12R12/webagent/config/SmHost.conf"
You will find the current hostconfig and hostname in the smHost.conf file
br,
Punit
1 comment:
GOOD post! Thanks for SHARING a good stuff related to DevOps, Explination is good, nice Article
anyone want to learn advance devops tools or devops online training
DevOps Online Training
DevOps Online Training hyderabad
Post a Comment